And what does the Lord require of you but to do justly, and to love kindness
and mercy, and to humble yourself and walk humbly with your God? (Micah 6:8)

Showing posts with label Christmas. Show all posts

Saturday, September 21, 2019

Joyful Christmas - DD Color Challenge

Happy Saturday, everyone!  It's time for another Divinity Designs Color Combo Challenge. This month we are using colors inspired by papers from the beautiful Christmas Collection 2018.  

This challenge was perfect for getting a jump start on my Christmas cards this year so I decided to use the pretty poinsettias from the Joyful Christmas Stamp/Die Duo for my sample.


Creative Nugget:  The Pop Out Card with Layers Dies were used to cut the base of my card from heavy card stock and the layers from the Christmas Collection 2018 papers.  Copic Markers were used to color the poinsettias which were popped onto a doily cut with one of the Fancy Circle Dies.  A Belly Band was cut to hold the card closed and the doily panel was mounted to the front of it.

When the Belly Band is removed the card pops open to reveal a sentiment from the Joyful Christmas Stamp/Die Duo.  The dies used to create the sentiment panel include the Layered Lacey Squares, Pierced Circles, and Circles.


These cards will be submitted for the following challenges:
Thanks so much for stopping by.  Be sure to hop on over to the Divinity Designs Blog to check out the other beautiful Color Challenge projects created by the Divinity Divas!

Have a wonderful weekend!

Hugs,
Cathymac

Friday, September 6, 2019

Deck the Halls

Hello friends!  I know it is only September, but it is not too early to begin working on cards for Christmas.  The new Deck the Halls stamp set designed by Rebecca Rios just released by Sweet 'n Sassy Stamps is a wonderful set for creating your holiday cards.  I'm sharing these cards over on the Sweet 'n Sassy Stamps Blog as well.

Creative Nugget:  My first sample was made by creating a wreath with the holly leaves included in the Deck the Halls set.  Some of the leaves were cut out and popped onto the wreath for dimension.  The berries were stamped and covered with Glossy Accents.  The Christmas ball was colored with Copic Markers and hung from the wreath with metallic thread.  A bow was added, a sentiment embossed and a strip of patterned paper added to finish the card.

Creative Nugget:  On my second card, the popcorn and cranberry garland was stamped repeatedly across the card and colored with Copic Markers.  The cranberries were covered with Glossy Accents.  The Christmas balls were hung with metallic thread and the sentiment embossed on a stitched circle die cut.  Behind  the popcorn panel is a strip of red card stock on which the script from Texture Tiles 1 was white embossed.

These stamp sets from the Sweet 'n Sassy Stamps Store were used to create the cards above:


These cards will be submitted for the following challenges:


Thanks so much for stopping by...thinking and praying for those in the path of Dorian!

Hugs,
Cathy

Tuesday, July 9, 2019

Two for Tuesday - Elegant Embellishments

Hello everyone!  It's time for another Two for Tuesday feature over at the Divinity Designs Blog.  I was feeling like a little Christmas in July so I used the Elegant Embellishments stamp set and the coordinating Elegant Embellishments Dies from Divinity Designs for my two cards today.


Creative Nugget:  White card stock and paper from the Christmas Collection 2018 were cut with a Pierced Rectangle Die and pieced together to make the card front on this CAS version.  The ornaments and sentiment from the Elegant Embellishments set were stamped on coordinating papers, silver embossed and cut with the coordinating dies.   The ornaments were hung with silver metallic thread.  Bows and pearls were added to finish the card.


Creative Nugget:  For the stepped up version, the white panel was embossed with the Flourishes Embossing Folder.  The Merry Christmas Border was cut three times and stacked with the silver embossed layer on top.  The edges of a Scalloped Rectangle were silver embossed and layered behind the card front which was then mounted to the card base.

Be sure to hop on over to the Divinity Designs Blog to see more Two for Tuesday creations!

These cards will be submitted for the following challenges:

Happy Little Stampers Challenge - July Anything Goes with Dies
ABC Christmas Challenge - N & O are for No Peeking and Ornament
Always Fun Challenge #118 - Anything Goes
Crimbo Crackers Challenge #188 - Christmas Anything Goes
Jingle Belles Tic-Tac-Toe (Stamping/Bling/Die Cuts)


Hope your week got off to a great start...thanks so much for stopping by!  

Hugs,
Cathymac

Tuesday, June 11, 2019

Two for Tuesday - Adventure Awaits

Hello friends!  It's time for another Two for Tuesday feature over at the Divinity Designs Blog.  Today I am using the new Adventure Awaits stamp set and the Bubbles Stencil from Divinity Designs to create two Christmas cards.


Creative Nugget:  Curvy Slopes Dies and Cloud Border Dies were layered onto a card front cut with a Pierced Rectangle Die.  One of the Cloud Borders was cut from vellum.  The Neighborhood Border Die was cut twice...one from a discarded mixed media panel found in my sash which was cut apart and layered over the bottom white layer.  The sentiment from the Adventure Awaits was embossed on the bottom slope.  A bow and some sequins were added to finish the card.


Creative Nugget:  An additional layer was added to this stepped up version of the card above.  A piece of paper from the Old Glory Paper Pad was cut with a Pierced Rectangle Dies and sponged with white ink through the new Bubbles Stencil and splattered with watered down white acrylic paint.  The sentiment was stamped on a square die cut and framed with a scrap of Old Glory paper cut with one of the Lacey Corners Dies.  The whole card was mounted to card stock cut with a Scalloped Rectangle Die.

Be sure to hop on over to the Divinity Designs Blog to see more Two for Tuesday creations!

These cards will be submitted for the following challenges:


Pammie's Inky Pinkies Challenge 1923 - Anything Goes
ABC Christmas Challenge L & M are for? - L is For Little (houses)
Cute Card Thursday Challenge 585 - Anything Goes
Fab 'N' Funky Challenge #443 - Something New
Happy Little Stampers - June Anything Goes with Dies


Thanks so much for stopping by!  

Hugs,
Cathymac

Tuesday, December 18, 2018

Two for Tuesday - Winter Greetings

Hello friends!  Well "Owl" be...it's time for another Two for Tuesday feature over at the Our Daily Bread Designs Blog.  I used the owl from the new Winter Greetings stamp set for both of my cards.


Creative Nugget:  Distress inks were sponged and splattered on a panel cut with a  Pierced Rectangle Die for a very simple background.  The owl from the Winter Greetings stamp set was colored with Copic Markers and the panel cut with a Pierced Square Die.  Pierced Square Dies were also used to create a simple frame around the owl.  I love the font on this sentiment from the Peaceful Wishes stamp set and white embossed it on a vellum band that was wrapped around the front of the card before it was mounted onto the card base.  A few pearls were added to finish the card. 

Creative Nugget:  A panel of paper from the Christmas Collection 2017 Paper Pad was cut with a Pierced Rectangle Die and was used for the background on the stepped up version of the card. This time Lacey Corners Dies were used to frame the owl. 

Be sure to hop on over to the Our Daily Bread Designs Blog to see more Two for Tuesday creations!


These cards will be submitted for the following challenges:

Thanks so much for stopping by!  

Hugs,
Cathymac

Friday, December 14, 2018

Looking Back at the ODBD December 2018 Release

Good morning, friends!  Today we are taking another look at the ODBD December 2018 Release.  Some of the new product were used to make a card and gift bag set. 


My samples use the new Peaceful Wishes stamp set 


Creative Nugget:  The green card stock was cut with a Pierced Rectangle Die and the trees from the Peaceful Wishes stamp set were gold embossed.  VersaMark refill ink was splattered onto the panel and gold embossed as well.  Snowflakes were cut from gold card stock using the Snow Crystals Dies.  The Curvy Slopes Dies were used to cut the snowdrift at the bottom of the card. Gold Pearls were added to the centers of the snowflakes to finish the card.  The same card was made in blue and silver:


Here is the gift bag:

Creative Nugget:  The Card Caddy & Gift Bag Dies and the Gift Bag Handles and Topper Dies were used to construct the gift box.  The front of the bag was created the same way as the card above.  The Gingham paper on the topper is from the Christmas Collection 2013 Paper Pad.

Both projects can be seen below.


Be sure to check out the Our Daily Bread Designs Blog, Facebook Page, and Instagram to see more beautiful samples created with the December Release products by the Breadbasket Designers.

Thanks so much for stopping by...hope you were inspired!

Hugs,
Cathymac

Saturday, December 1, 2018

Welcome to the ODBD December 2018 Release

Hello, friends!  Welcome to the Our Daily Bread Designs December 2018 Release.  The stamp sets being release this month feature scenes from the great outdoors and are perfect for your wintery and masculine card making needs. The new Vintage Label Flip Card with Layers Dies and Double Pierced Vintage Labels Dies are wonderful for matting the images and and help to make creating a fancy fold card a snap!


My first sample was made with the new Peaceful Wishes stamp set and the Peace & Joy Die


Creative Nugget:  The snow covered trees from the Peaceful Wishes stamp set were colored with Copic Markers on a Pierced Rectangle cut panel and sprinkled with glittery Frosting Powder for lots of sparkle.  The Peace & Joy Die was used to cut the words from the panel after the trees were colored.  The words were stacked five times for dimension and popped back into the panel.  A few Snow Crystals Dies were used to cut snowflakes which were covered with the Frosting Powder and added to the scene to finish the card.

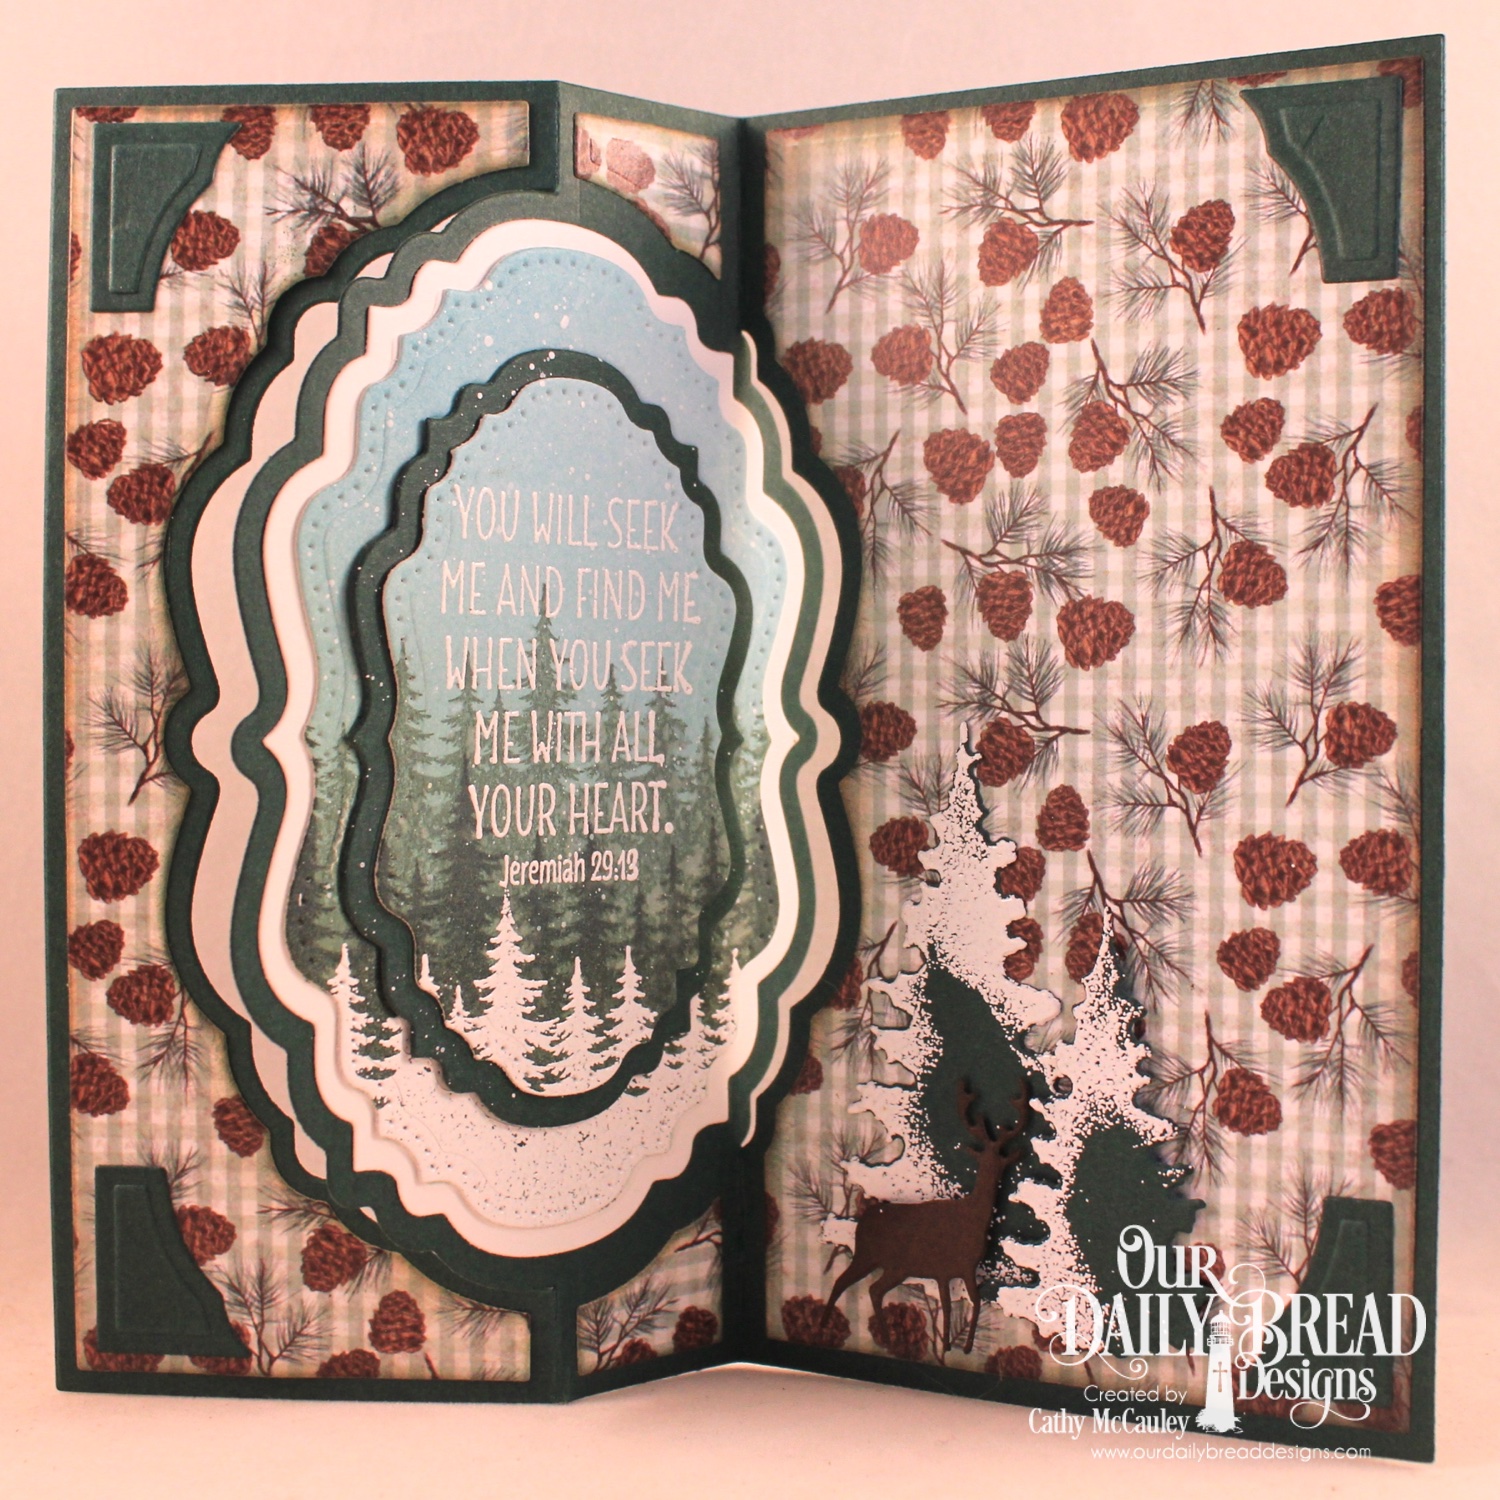
My second sample was made with the new Seek Me stamp set and the Vintage Label Flip Fold Card with Layers Dies

Creative Nugget:  The Vintage Label Flip Fold Card with Layers Dies were used to cut the card base from green card stock and the layers from paper in the Christmas Collection 2017 Paper Pad.  Green and blue Oxide Inks were sponged onto a mixed media panel and the trees from the Seek Me stamp set were stamped and white embossed on the panel which was then splattered with watered down acrylic paint.  The panel was cut with a Double Pierced Vintage Label Die and mounted onto the flip card.  The sentiment was white embossed.

The same steps were followed for the inside of the flip panel.  A smaller Double Pierced Vintage Label Die was used to cut the center from the scene and the sentiment white embossed over stamped images.  The small panel was mounted to a green layer cut with a Vintage Label Die and this was popped back onto the flip card.  The Trees & Deer Dies were used to add accents to the inside of the card.

Close up views of the stamped scenes can be seen above.

These new products from the Our Daily Bread Designs Store were used to create the cards above...


Thanks so much for stopping by...hope you were inspired to work on those Christmas cards!

Hugs,
Cathymac

Wednesday, November 14, 2018

Thrill of Hope

Hello friends!   Today I am sharing two cards for several challenges made with a new favorite stamp set by Sweet 'n Sassy Stamps...Thrill of Hope.

Creative Nugget:  Distress Oxide Inks were applied directly to a large acrylic block, spritzed with water and smeared onto a piece of mixed media paper to create the background for the trees. The same inks were used to sponge the sky and snow drifts on the card base.  The tree border from the Thrill of Hope stamp set was stamped in purple along the bottom of the card and the deer, cut with a Scan 'N Cut, was popped onto the card.  The sentiment was white embossed to finish the card.

Creative Nugget:  The Buffalo plaid from the Texture Tiles 4 stamp set was stamped in red on Kraft card stock to make the border along the left side of the card.  The tree border was stamped in Frayed Burlap ink at the bottom of another panel of Kraft card stock.  The large trees and sentiment were white embossed and snowflakes stamped in white and Frayed Burlap inks were added to the sky along with white paint splatters.  Tiny gems were white embossed and added to the snowflakes for added dimension to finish the card. 


These cards will be submitted for the following challenges:

Thanks so much for stopping by!
Have a wonderful day!

Hugs,
Cathy

Friday, November 9, 2018

Poinsettia Box

Hello friends!  Everywhere you go, you are beginning to see Christmas decorations and lights going up all over the place...yes, even before Thanksgiving.  That can only mean that Christmas will be here before you know it.  I'm still working on getting my Christmas cards finished so reached for Our Daily Bread Designs new Poinsettia Box stamp set to make a little gift box for a gift certificate.


Creative Nugget:  The Card Caddy and Gift Bag Dies along with the Gift Bag Handles and Topper Dies were used to cut card stock and papers from the Retro Christmas Paper Pad for the gift box.  The Poinsettia Box was colored with Copic Markers and the panel cut with a Pierced Square Die.  Retro Christmas Paper was cut with the Layered Lacey Squares Die to make a frame for the Poinsettia Box.  The bow die from the Christmas Bells Dies was used for the bow and the sentiment was stamped on a tag cut with the A Gift For You Dies.

This gift box will be submitted for the following challenges:

Thanks so much for stopping by...have a wonderful weekend!

Hugs,
Cathymac

Friday, October 26, 2018

Rejoice

Happy Friday, dear friends!  My stash of Christmas cards is growing, but I still need many more, so my Christmas card for today was made with some new stamps and dies released from Our Daily Bread Designs this month.


Created Nugget:  The Side Step Card Die was used to make the base for this card.  The papers used are from the Christmas Collection 2014 Paper Pad.  I had fun creating Distress Oxide panels on mixed media paper to match the colors of the designer papers.  The Oxide panels were cut with the Bethlehem Dies to create the city of Bethlehem layered on each step of the card.  The wise men from the Great Joy Stamp/Die Duo were colored with Copic Markers and cut with the coordinating die.  The sentiment from the stamp set was split and embossed on two different layers of the card.  Another Christmas card finished!

Thanks so much for stopping by!  Hope you have a wonderful weekend!

Hugs,
Cathymac

Tuesday, October 9, 2018

Two for Tuesday - Great Joy

Hello friends!  It's time for another Two for Tuesday feature over at Our Daily Bread Designs.  It's not too early to begin working on those Christmas cards.


Creative Nugget:  For the CAS version of my card, layers of white and black card stock were cut with Pierced Rectangle and Double Stitched Rectangle Dies.  A window was cut with one of the Tri-Shutter Layers Dies.  Letter J, Letter O and Letter Y dies were used to cut mixed media paper smooshed with Distress Oxide Inks.  The sentiment from the Great Joy Stamp/Die Duo was stamped under the letters after masking off the word "Joy." The poinsettia accent was cut from the left over mixed media panel using the Peaceful Poinsettia Dies.


Creative Nugget:  Paper from the Holly Jolly Collection and a Neighborhood Border die cut were added behind the window on the stepped up version of my card.  Extra layers on the poinsettia were cut with the Merry Mosaics Dies from the same sheet of designer paper.

Be sure to hop on over to the Our Daily Bread Designs Blog to see more Two for Tuesday creations!


These cards will be submitted for the following challenges:


Thanks so much for stopping by!  

Hugs,
Cathymac

Thursday, October 4, 2018

Throwback Thursday - Cathedral Window Die

Hello friends!  It's Throwback Thursday over at Our Daily Bread Designs and the features for today are the Cathedral Window Die and the Cathedral Window Marble stamp.  The Cathedral Window products are beautiful and are perfect for any occasion, but I chose to make a Christmas card.


Creative Nugget:  The Cathedral Window Marble was stamped onto a Distress Oxide panel, cut with the Cathedral Window Die and the stained glass panes were covered with Glossy Accents. Gray and cream card stocks were also cut with the die and layered to make the window which was popped onto a Lattice Background die cut and paper from the Christmas Paper Collection 2014.  The vintage light from the new Christmas Greetings Stamp/Die duo was used to decorate the window for Christmas along with some greens cut with the Pine Branches Dies.  The sentiment was stamped on a tag cut from the A Gift For You Dies.  

To see more samples using the Cathedral Window Die head on over to the Our Daily Bread Designs Blog.


This card will be submitted for the following challenges:

Thanks so much for stopping by...Enjoy your day!

Hugs,
Cathymac

Monday, October 1, 2018

Welcome to the ODBD October 2018 Release

Hello, friends!  Welcome to the Our Daily Bread Designs October 2018 Release.  It's not too early to begin thinking about all of those Christmas cards you will need for the upcoming Christmas season.  This month's ODBD release is filled with wonderful stamps sets and dies perfect for your Christmas crafting!

My first sample was made with the new Great Joy Stamp/Die Duo, the Diorama with Layers Dies, and the Bethlehem Dies

Creative Nugget:  The Diorama Dies were cut from card stock and the Diorama Layers Dies were cut from papers from the Christmas Card Collection 2016.   The back panel of the diorama was splattered with acrylic paint and rays were sponged with white ink.  One of the Splendorous Stars Dies was used to cut a star for the night sky.  The wise men from the Great Joy Stamp/Die Duo were colored with Copic Markers and cut with the coordinating die.  The divider panels inside the diorama were layered with cuts made with the Bethlehem Dies.  The sentiment was cut with a Pennant Flag Die and added to the top of the diorama.

My second samples made with the new Christmas Greetings Stamp/Die Duo.

Creative Nugget:  Layers of papers from the Christmas Collection 2015 and Christmas Coordinating 2015 Paper Pads were cut with Pierced Rectangle, Double Stitched Rectangle, and Lavish Layers Dies.  The vintage Christmas light and pine bough from the Christmas Greetings Stamp/Die Duo were stamped on the lavish layers panel and colored with Copic Markers.  The sentiment was gold embossed and attached to the bottom of the card.  A metallic gold bow was added to the pine bough to finish the card.

These new products from the Our Daily Bread Designs Store were used to create the cards above...


Thanks so much for stopping by...hope you were inspired to start those Christmas cards!

Hugs,
Cathymac